The Peg Trousers Tutorial

Tools & Materials
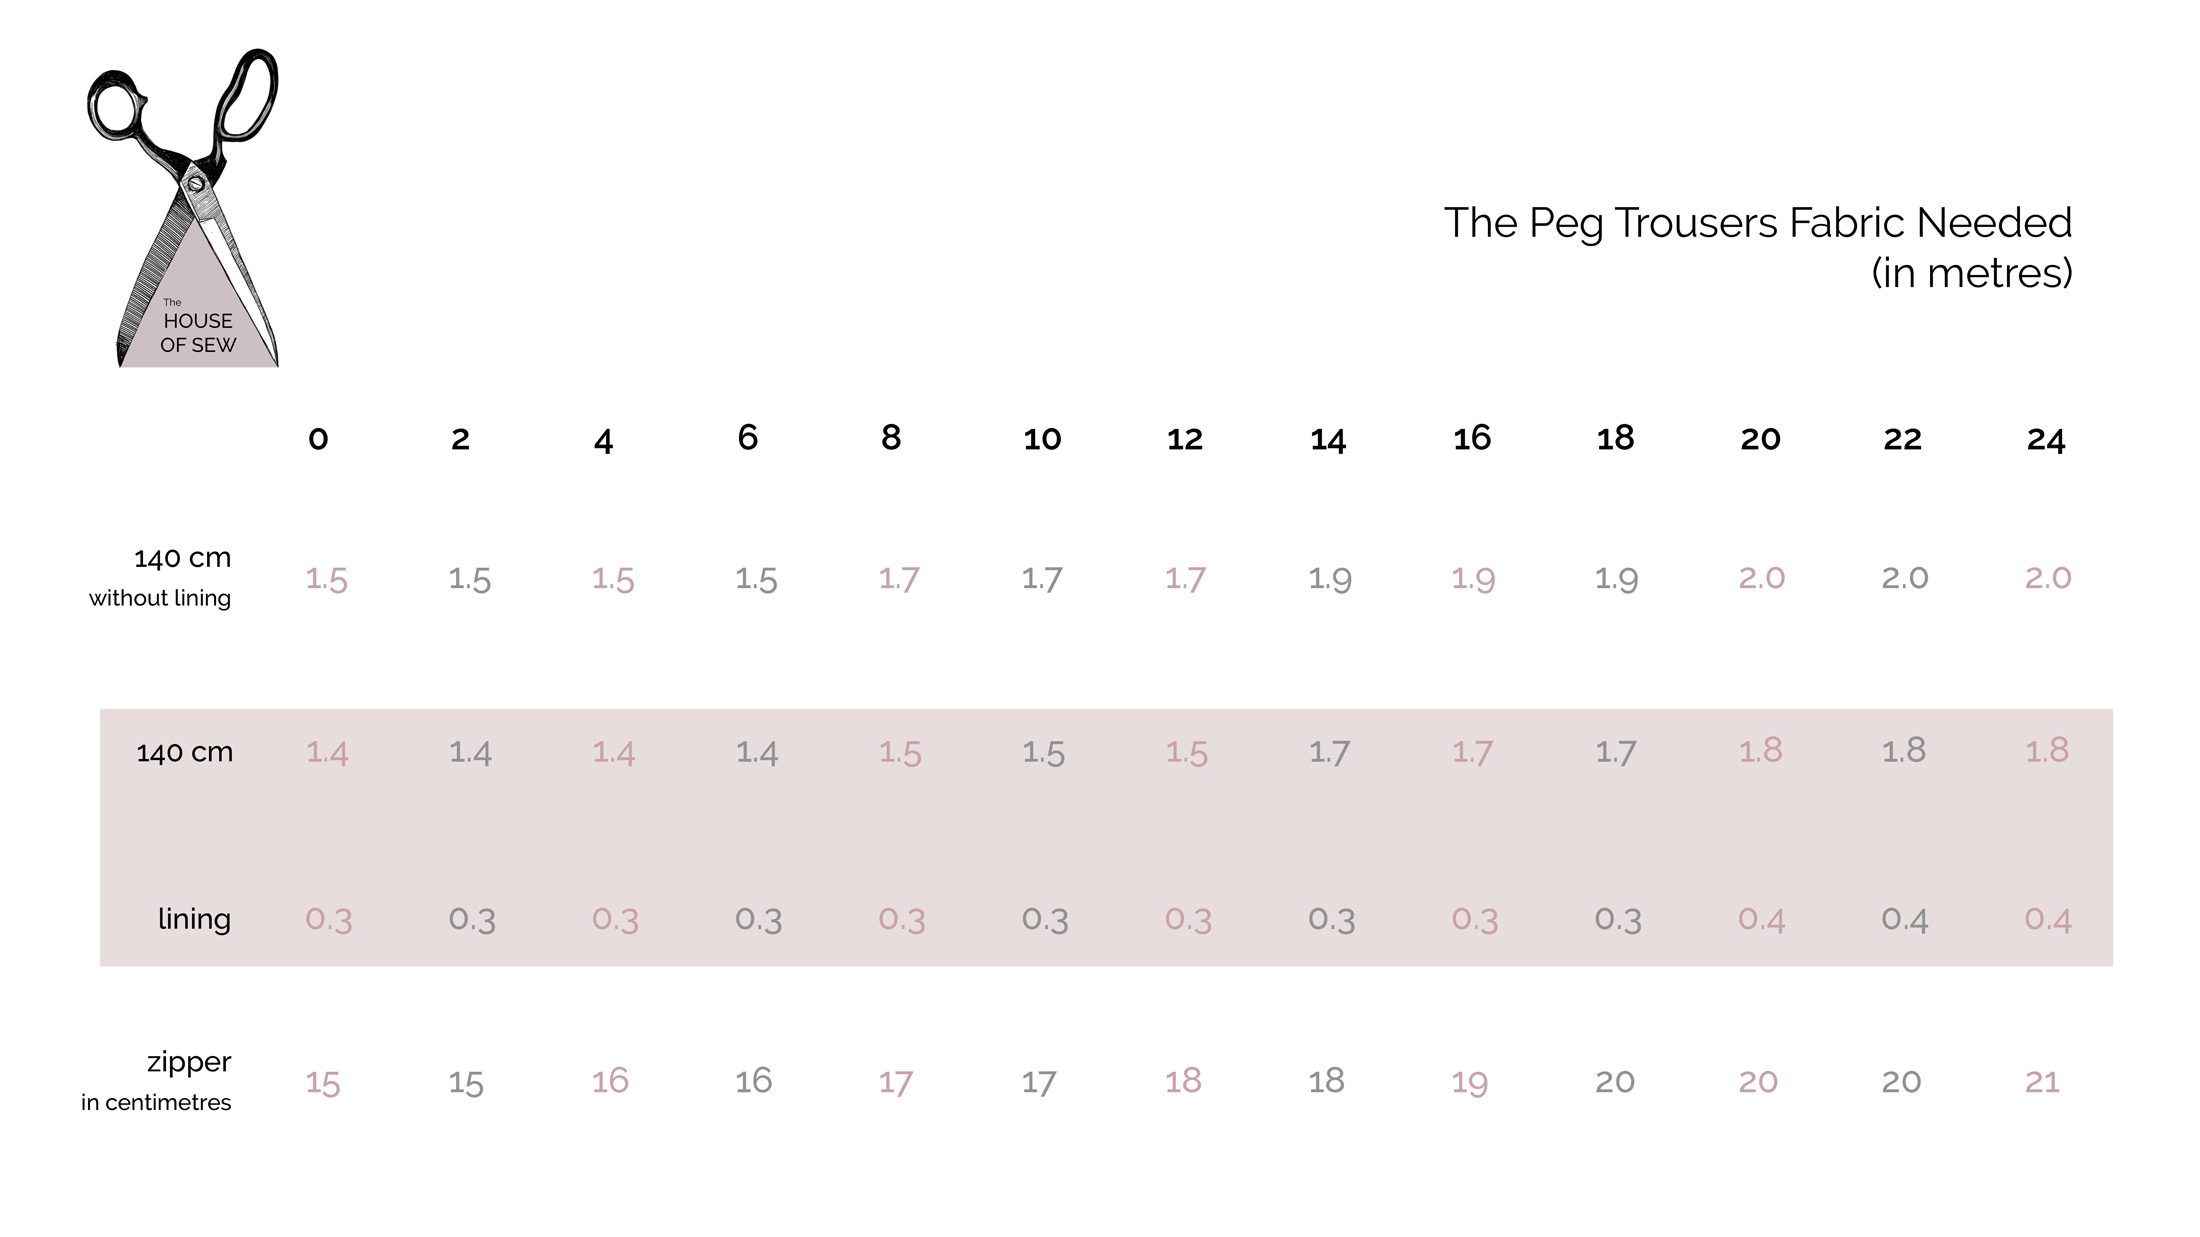
- 2 metre – 2.25 metre of Fabric (140cm wide)
- 0.20 metre of lining fabric for pockets
- 1-2 metres of Fusible Interfacing
- 1 x Zipper (reference pattern for length)
- 1 x Trouser D-Hook & Bar
- Thread
Cutting, Pleats & Darts
1. Start by folding your fabric in half, selvedge to selvedge.
2. Lay out and pin (or trace) pattern pieces according to your fabric width. Remember, the grain line is always parallel to the selvedge. Cut and notch accordingly.
3. Once you have your pieces cut out and notched, start with matching and ironing your pleats. Line the outer notches together while folding down the middle notch, sew a stitch down the creased folds on the wrong side roughly 10-15 centimetres. (I forgot to photographed this process so the photo in place, is what the pleats should look like from the good side).
4. Next, mark the back dart lines and sews. I like to run a needle and thread from the top to the bottom peice to ensure accuracy of the dart placement.


Pockets
5. Match top pocket bag with front pocket facing, good side to good side. Stitch pocket in place with a 1 cm seam allowance. Press and serge or zig-zag the raw edges.
*Optional: Edge stitch on the top pocket bag for a cleaner finish. Remember to catch the seam allowance on the wrong side.
6. Align the bottom pocket bag and pocket bag facing. Stitch and finish the raw edges.


7. Now match the facing edge of the top pocket to the pocket opening of the trousers. Stitch, press, and serge the raw edges.
8. Align the bottom and top pocket bag together, matching the curve of the pocket. Stitch and finish the raw edges.
9. Baste the top of pocket bag to the front of the trousers to prevent it from moving around.


Zipper
10. Fuse the interfacing onto the fly guard. Serge or zig-zag the raw edges minus the top.
11. You can reference our trouser fly zipper tutorial for step-by-step instructions.


Crotch Seam, Side Seam, Inseam
12. With the right sides together, line up the back and front side seams and inseams of the trousers. Stitch, press, and lastly, serge or zig-zag the raw edges.
13. Repeat for the other leg.
14. When the seams are all nicely pressed, we’re going to join the two separate leg pieces together by placing one leg inside the other and sewing around the crotch curve.
With one leg the right way out and the other leg inside out. Place the inside out leg into the right sides out one, so that right sides are together.
15. Once this is done, press the seam allowance open all the way around. It’s a tricky area to press, so you might find a tailor’s ham or sausage will help.


Waistband
16. This next step is an option depending on the type of fabric you are using. Place the interfacing glue side down, on the wrong side of the top waistband. Make sure to place it 1 centimetre away from the side and bottom edges of the waistband. Iron with the appropriate heat setting.
17. Start by pressing the seam allowance roughly 8mm up along the bottom edge of the inside waistband (the piece without interfacing if you are using interfacing). This edge should be pressed approximately 2-3 mm less than the final seam allowance. For example, if the waistband seam allowance is 3⁄8″ (1 cm), this edge of the waistband should be pressed 7-8 mm
18. Line up the right sides of the two waistband pieces together and sew along the top edge and both sides of the waistband.
19. Trim around the corners to eliminate bulk for the next step. Press the seam allowance; this will get tricky closer to the corners but work around it the best you can.
20. Next, turn the waistband right side out and press along the edges.
*Use a point turner tool to get the corners nice and sharp!


21. Now attach the top waistband to the rest of the trousers. Start by lining up the centre back notches together and work your way around the other notches. Once completed, pin the remainder of gaps to ensure the correct fit. Stitch the waistband down, 1 cm seam allowance.
22. Time to close off the waistband! The folded edge should be neatly pinned along the seam so that it covers the stitch line. Make sure to insert the pin directly into the ditch of the seam, securing the underside of the binding.
Pin from the right side of the garment for easier removal when you sew.
*Check that the pins have captured the folded binding edge on the underside of the garment.
23. Use the edge joining foot if you have one to complete the next step, it will make your life easier! A regular foot will work but will require more patience. Place the machine’s needle in the ditch of the seam. Sew slowly as you guide it through the ditch. Remove the pins as you approach them. The finished stitch is invisible on the right side of your garment while capturing the inside folded edge.
24. Sew on your D-hook and finish your hems to complete your trousers!
*Alternatively, you can add a buttonhole and buttons if you find D-hooks difficult to install.


