The Every Wear Trouser Tutorial

Tools & Materials
The Every Wear Trouser Pattern
Sizing guide
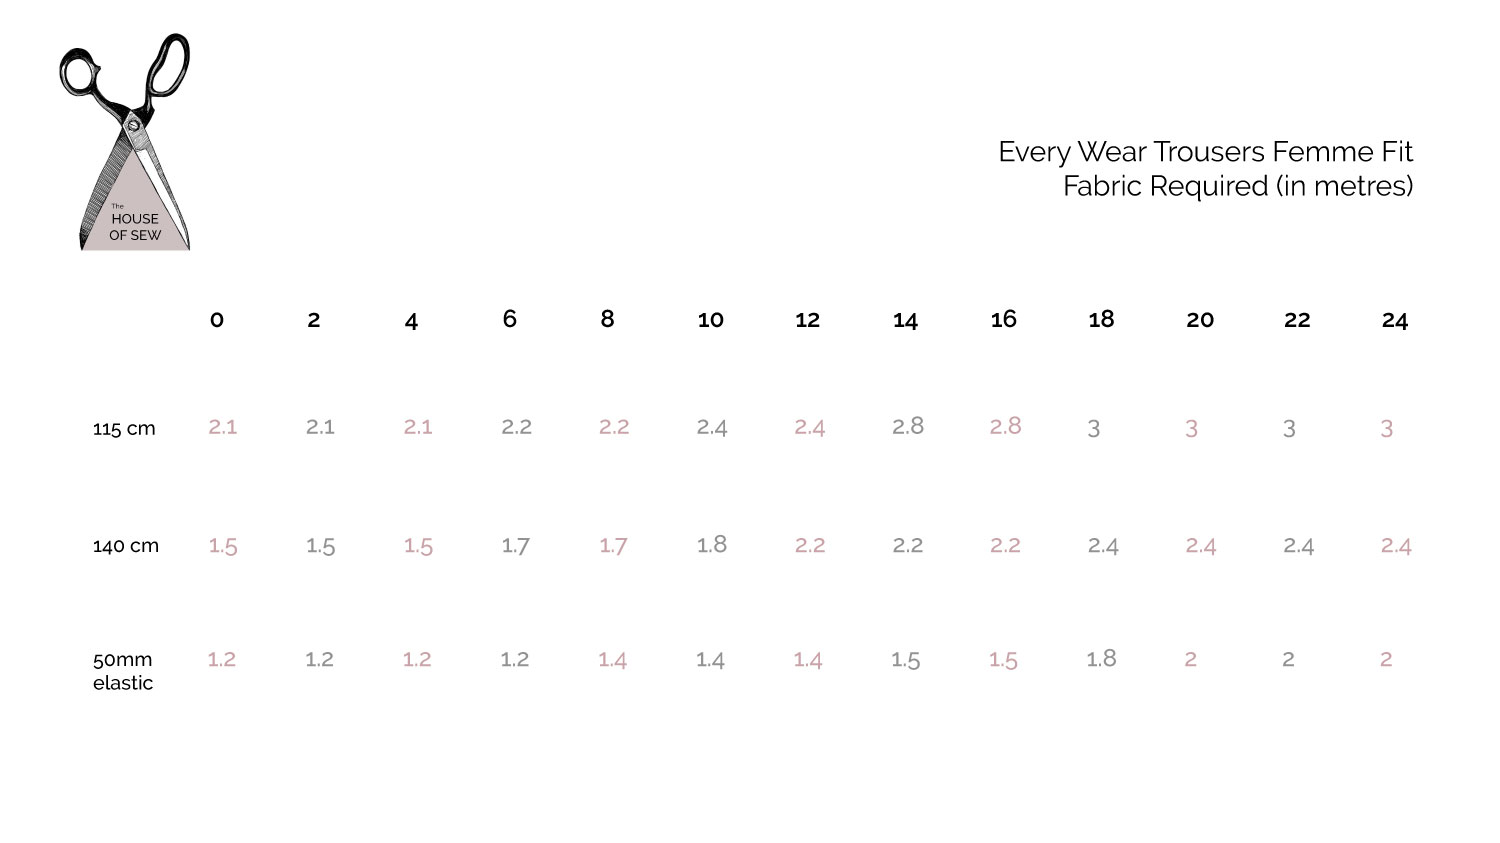
Meterage Guide – Femme
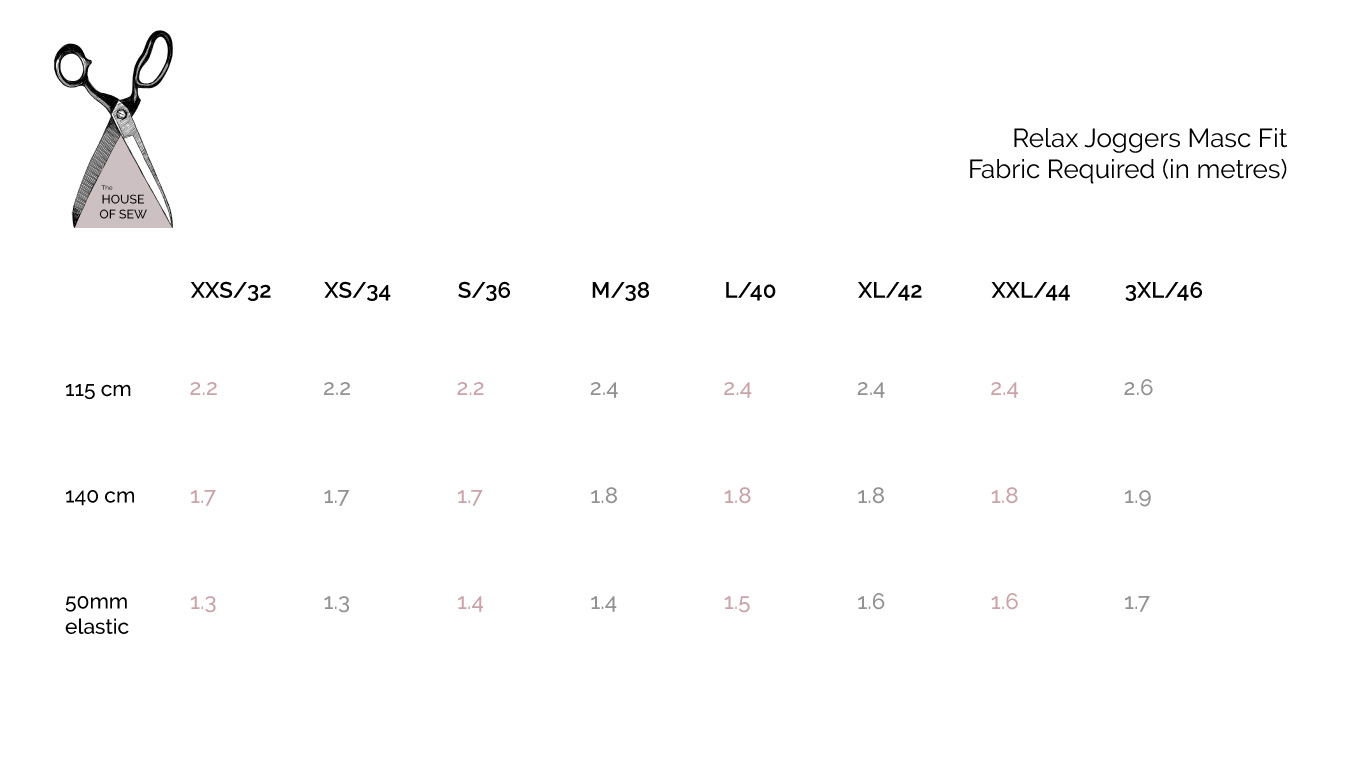
Meterage Guide – Masc
- 1.5 – 3 metre of Fabric (140cm wide)
- 1.5″ Non-Roll Elastic or Woven Elastic
Cutting
1. Start by folding your fabric in half, selvedge to selvedge.
2. Lay out and pin (or trace) pattern pieces according to your fabric width. Remember, the grain line is always parallel to the selvedge. Cut and notch accordingly.


Pockets
3. Match top pocket facing with the front of the trousers, good side to good side. Stitch pocket in place with a 1 cm seam allowance. Press and serge or zig-zag the raw edges.
*Optional: Edge stitch on the top pocket bag for a cleaner finish. Remember to catch the seam allowance on the wrong side.
4. Align the bottom and top pocket bag. Stitch and finish the raw edges.
5. Baste the top of the completed pocket to the front of the trousers to prevent it from moving around.
6. Repeat steps 3-5 for the other side.
Inseam, Side Seam, and Crotch Seam
7. One leg at a time, place the front and back leg pieces right sides together. Pin from the crotch point down to the hem of the trousers. Pin the sides of the trousers together. Backstitching at the beginning and at the end, sew these two pieces together.
8. Repeat for the other leg.
9. When the seams are all nicely pressed, join the two separate leg pieces together by placing one leg inside the other and sewing around the crotch curve. One leg right way out and the other leg inside out, place one leg into the other, right sides touching.
With one leg the right way out and the other leg inside out, place one leg into the other, right sides together.
10. Line up the crotch seam, making sure to match the edges, notches and the inside leg seams. Pin the two legs together and stitch in place. Remember seam allowance is still 1 cm all the way around.
11. Once this is done, press the seam allowance open all the way around. It’s quite a tricky area to press, so you might find a tailor’s ham or sausage will help.


Waistband
12. Match the waistband side seams, stitch and press. Matching the long sides together, fold the waistband in half and press.
13. Align top edges of trousers and waistband together, pin, and stitch in place.
Waistband: Sink Stitch Method (skip to step 17 for the easy method)
14. Press the seams upwards into the waistband. The goal is to hide the seams in between the waistband.
– Press the unfinished outer edge of the waistband in towards the wrong side. This edge should be pressed approximately 2-3 mm less than the final seam allowance for this edge. For example, if the waistband seam allowance is 3⁄8″ (1 cm), this edge of the waistband should be pressed 7-8 mm.
15. Time to close off majority of the waistband. The folded edge should be neatly pinned along the seam so that it covers the stitch line. Make sure to insert the pin directly into the ditch of the seam, securing the underside of the binding.
Pin from the right side of the garment for easier removal when you sew. Leave a gap about 6-8 cm wide in the waistband so that you can feed the elastic through.
*Check that the pins have captured the folded binding edge on the underside of the garment.
16. Use the edge joining foot if you have one to complete the next step, it will make your life easier! A regular foot will work but will require more patience. Place the machine’s needle in the ditch of the seam. Sew slowly and pull the fabric lightly on either side of the needle as you guide it through the ditch. Remove the pins as you approach them. The finished stitch is invisible on the right side of your garment while capturing the inside folded edge.


Waistband: Easy Method
17. Time to close off majority of the waistband & cuffs. Fold the waistband in half so the raw edges line up with the other half of the waistband that is already attached to the trousers. Pin and sew in place leaving a small gap at the back, approximately 2″.
Elastic
18. Finally! Time to feed the elastic through the casing of the waistband. Grab onto the safety pin while pushing excess fabric towards the opposite end of the gap, eventually exposing the elastic. Once pulled through, butt the ends of the elastic tight together, zig-zag the raw edges to secure.
*Pro Tip: You are less likely to lose the elastic if you pin one end of it to the fabric!
19. Close off the gap using the ditch stitch or easy method for the waistband before serging the raw edges.