Olsen Top Tutorial

Tools & Materials
Olsen Top Pattern
Sizing guide
Meterage Guide – Olsen I
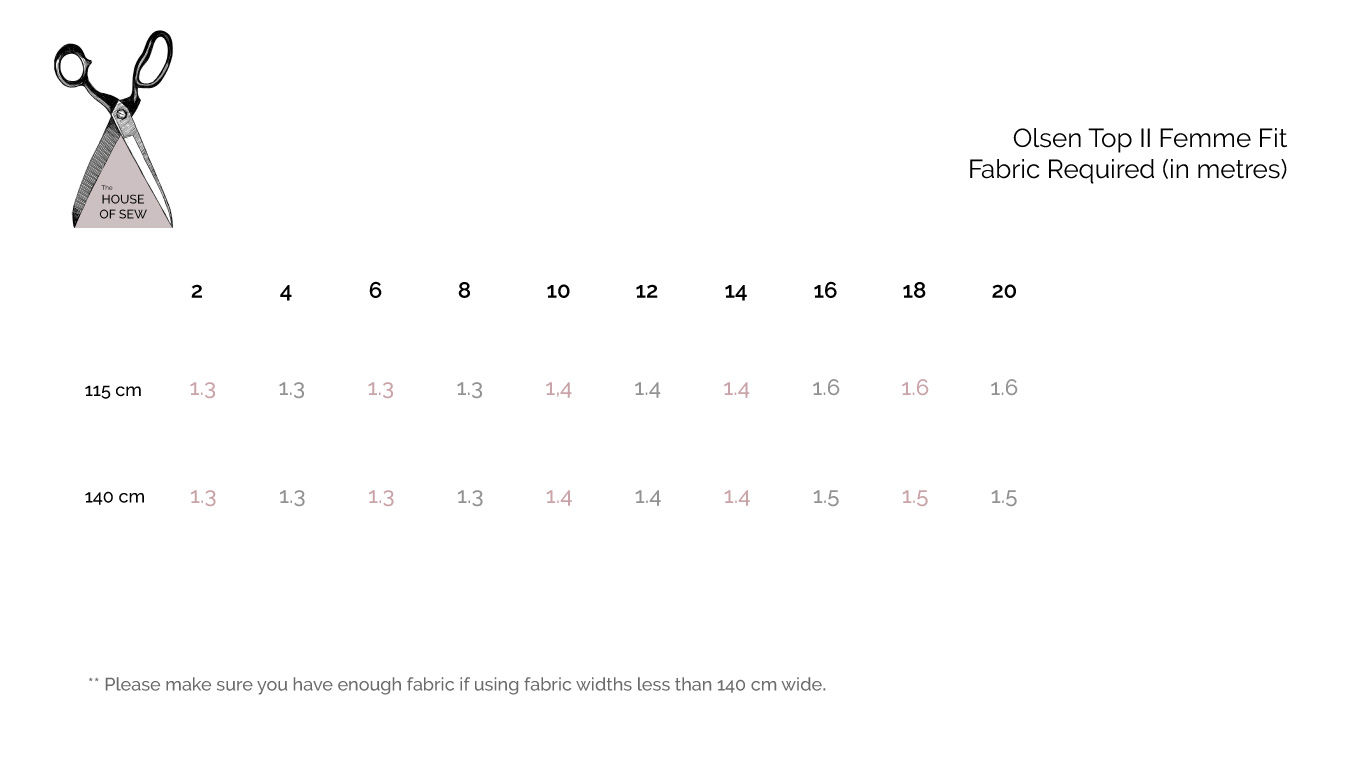
Meterage Guide – Olsen II
- Tailors Chalk
- Dressmaking Pins
- Dressmaking Shears
- 1 metre – 1.25 metre of Fabric (140cm wide)
- Single fold bias tape (optional)
- Thread
Body
1. With right sides of the shirt front and back together, line up the shoulders, pin, and sew them together using a 1 centimeter seam allowance.
Remember to backstitch at the beginning and at the end of your stitch.
Always press your seams – this is key to making your garments look more professional and less homemade.
2. With right sides of the shirt together, match up the front and back side seams, pin, and sew together using a 1 centimetre seam allowance. Press.
3. Serge or zig-zag the raw edges of the shoulder and side seams.


Sleeves (If you have the version without sleeves, go to step 6)
4. Line up the underarm seam of the sleeve and stitch together. Matching the start and end of the seam, work from the hem towards the underarm, this forces any discrepancies to the underarm edge, which can be corrected when sewing the sleeve onto the body. Press and then serge or zig-zag the raw edge of the seam.
5. Begin pinning the sleeve into the armhole, anchor it at key points — underarm sleeve, shoulder point, front and back notches. Pin the rest of the gaps. Seam allowance is still 1 centimetre. Press and then serge or zig-zag the raw edge of the armhole.
Facing or Binding **Option to finish the neckline with a facing or binding.
For binding, we recommend a clean finish binding. You can make your own or purchase a single fold bias tape.
6. Facing: Pin front and back together at the shoulder seams, right sides together, matching up the notches. Stitch.
7. Now pin the facing to the neckline. It is helpful to add an extra notch at the centre front and centre back to help match them up – fold the bodice and facing in half lengthways, and snip a small notch at the neckline on the fold.
8. Pin the facing to the neckline, right sides together. Start by matching up the shoulder seams, centre front and centre back before pinning the rest. Stitch and press.
Hems
9. Turn sleeve hem 1 centimetre and then another 2.5 centimetre. Topstitch.
Version without the sleeves: turn armhole hem 1 centimetre and then another 1 centimetre. Topstitch.
10. Turn shirt hem 1 centimetre back and then another 2.5 centimetre. Topstitch.
11. Hooray! Now go try it on!
